Although it’s still informative, this post is outdated. Unless you are a software developer who wants to understand the theory behind pitch tests, we have created an online lenticular printing pitch test pattern creation APP for you at
https://www.vicgi.com/lenticular-pitch-test.html
Introduction
If you have been following the tutorials we have published (such as 3D Lenticular Printing Interlacing Algorithm Illustrated Using Photoshop and Converting a 2D picture to a 3D Lenticular Print) you must have encountered a term called “Pitch Test”.
The Pitch test is a very important step and one must not skip. Simply put, the need for a pitch test is to avoid miss-alignment between the lenticules on the lenticular sheet and the interlaced image that is ready for printing. In other words, we need to ensure a 40LPI (Lenticule Per Inch) lenticular sheet has exactly 40 lenticules per inch as stated by the lenticular sheet maker’s technical specification. Likewise, the technical data published by the maker of the printer you are using must be accurate also.
Environmental factors such as temperature and humidity might also affect the result of a pitch test.
For example, a lenticular sheet with a published specification of 40 LPI maybe 40.1 LPI. The extra 0.1 LPI will be a catastrophe if it is not accounted for. A printer printing at the published 720 DPI (Dot per Inch) may also deviate from the specification and print at a slightly higher or lower resolution. The purpose of the pitch test is to identify such deviations so that miss-alignment can be avoided.
Much integrated lenticular printing software such as PhotoProjector, Imagiam, PhotoIllustion, and SuperFlip have built-in pitch test functions. But if you have followed our tutorials and prefer to just use bare bone Photoshop to accomplish a 3d printing project then you will need to create a pitch test pattern by yourself. This is the purpose of this article.
The Theory of Lenticular Pitch Test
As usual, we are going to review a little bit of math first. Let us use a 40 LPI lenticular sheet as an example. Since there are 40 lenticules per inch, therefore
Width of each lenticule = 1 ÷ 40 = 0.025 inch
Now depends on whether you are going to print your pitch test pattern using Epson (Artisan 50 for example) at 720 DPI or HP/Canon at 600 DPI, the number of pixels to represent 0.025 inch will be different. In this tutorial, we will use Epson 720 DPI printer as an example. You can easily deduct the numbers if you are using HP or Canon or any other 600 DPI printers.
At 720 DPI, there will be 18 pixels in 0.025 inch because 720 x 0.025 = 18 as shown in the picture below.
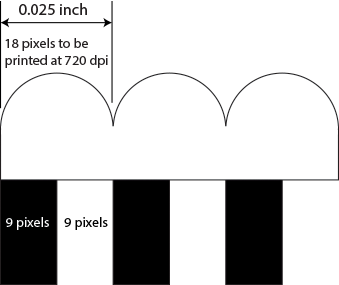
Our plan is to create a pattern where half of a lenticule will have a black stripe and the other half to have a white stripe as seen in the above picture (width of a lenticule). So there will be 9 pixels of black stripe and 9 pixels of white stripe in an alternating pattern. In this pattern, a perfect 40 LPI sheet will show a flipping effect where viewers will see either a solid black pattern or a solid white pattern by a side-to-side viewing orientation.
Pitch Test Pattern Around the Ideal Neighborhood
By the same deduction we can conclude that when the LPI is 40.1, the width of each lenticule will be 1 ÷ 40.1 = 0.02494 inch. Again at 720 DPI the number of pixels should be 17.955 pixels. Since pixel is the smallest unit we can use, i.e. we cannot create a 0.955 pixel dot, we will need to use this new set of numbers to create a new black and white pattern.
From the numbers we have derived above, i.e. 0.025 inch @ 40 LPI and 0.02494 inch @ 40.1 LPI, we can see that we need to re-size the stripes. This is where we can use Photoshop’s re-size feature to accomplish this!
Re-sizing from 0.025-in to 0.02494-in is equivalent to reducing the artwork (002494 ÷ 0.024) x 100%, or
1/40.1 ÷ 1/40 = 40 ÷ 40.1 = 0.997506 = 99.7506 %
From Photoshop go to [Image] > [Image Size…] we can bring up the re-size dialog as shown
Uncheck the [Constrain Proportions] checkbox so the height can be kept at the original, then change the way you want to re-size from [Pixels] to [Percent] as shown above.
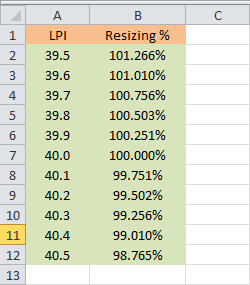
For the other LPIs, we can use a spreadsheet to calculate the re-sizing percentage as shown below. The formulae for cell B2, for example, will be = 40 / A2. You can then copy and paste cell B2 to the other cells and format the column to display in percentage.

Once re-sized, we can copy and paste to a letter size canvas as shown on the left and print it out on your target printer at the desired resolutions, 720 DPI on any Epson inkjet printer for example.
Vertical lines should also be printed along the edges to guide the alignment.
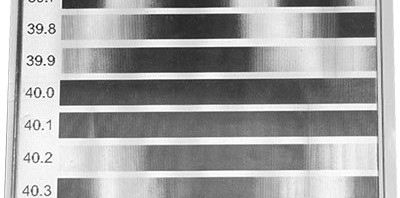
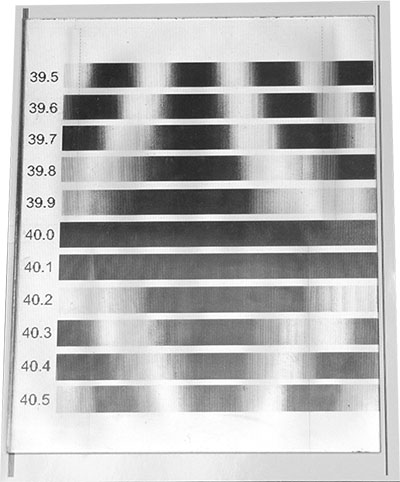
When we put a lenticular sheet over the pitch test pattern, we can determine the optimum setting by choosing the one that shows either solid black or solid white when we look at them with a side-to-side viewing orientation.
As shown in the picture below, the accurate LPI is proven to be 40 LPI. This is the 40 LPI, 8 x 10 inch lenticular sheet with adhesive backing you can purchase from us. Lens sold by us have been tested to be precise but that does not give us the reason to skip the pitch test. To be more accurate, we can even create a test pattern up to two decimal points with the same principles.
You can download the completed Photoshop pitch test pattern for 40 LPI from the link below.
40 lpi pitch test ( a 71.1 MB file)
Conclusion
We can’t emphasize more the importance of conducting a pitch test for any lenticular printing project. Without a pitch test, you are under the mercy of the published datasheet. Even if that is the case, your printer may not be printing at the exact resolutions you want. It is a misnomer that a lenticular sheet has been calibrated at a certain LPI because pitch test is for testing the combination of lenticular sheet and printer (and also the type of paper sometimes), and not just the lenticular sheet alone.


Resizing using Photoshop is only an approximation. Photoshop creates a pattern that has anti alias. But I agree this is the simplest way to create the pitch test pattern without the need for tons of algorithmic calculation.
Good work!
Hi, I shoot 3d images since years, but I’m totally new to lenticular printing.
I see prices and resolutions available are a lot… so what does it change? Why do higher res papers cost less?!?
Which resolution do I need for a normal 3d lenticular printi and for a multiframe print?